Which Warlock build is the strongest right now?
Two names dominate current Reign of the Warlock build discussions. The first is Echoing Strike, covered in depth by Maxroll's endgame build guide (last updated July 29, 2026), which presents it as the Warlock's premier endgame setup with a full skill, gear and rotation breakdown. The second is Fire Warlock, which community tier lists for the expansion place in S-tier — the highest overall ranking.
In practice the two complement each other: Fire Warlock is the smoother ride through leveling and early Hell farming, while Echoing Strike takes over once your gear comes online. Because Diablo II: Resurrected allows respecs through Akara's quest reward (and Token of Absolution later), you are not locked into your first choice.
The Warlock's cast rate, hit recovery and block rate breakpoints are now confirmed — the class shares the Necromancer's frame tables — so gear planning can target real numbers like 75% and 125% FCR. See our Warlock skill tree & breakpoints page for the tables.
Echoing Strike Warlock (endgame)
Echoing Strike is the build Maxroll features as its flagship Warlock endgame guide. The guide covers the complete package: skill point allocation, attribute distribution, gear slots, and the combat rotation you use in dense Hell-difficulty areas.
The broad shape of the build, per that guide:
- Skill plan: max the Echoing Strike core and its synergies first, then round out utility and survivability. Follow the linked guide's level-by-level order rather than improvising — synergy order matters for damage.
- Attributes: enough Strength and Dexterity for gear, everything else into Vitality, as with virtually every D2R build.
- Gear: the guide lists budget, mid-tier and best-in-slot options per slot, so you can start farming before the expensive pieces drop.
- Playstyle: the rotation is built around positioning packs and letting Echoing Strike's hits cascade — it rewards dense zones, which pairs naturally with Terror Zones.
Because Echoing Strike is the most-documented Warlock build, it is also the safest recommendation if you just want one answer: follow the Maxroll guide and you will have a viable endgame character.
Fire Warlock (S-tier all-rounder)
AOEAH's Reign of the Warlock expansion tier list (2026) ranks Fire Warlock in S-tier, making it one of the strongest builds in the current patch across all classes, not just within the Warlock's own options. S-tier placement reflects its mix of clear speed, boss damage and relatively forgiving gear requirements.
Fire Warlock also has a structural advantage in the current endgame: fire is a strong farming element in several of the best zones, and where fire immunes appear, sunder charms (after their Season 13 rework) offer a way to break immunities that did not exist in the game's early seasons.
If you are starting fresh — especially at a ladder reset — Fire Warlock is the lower-friction choice: it levels well, farms early, and converts into a serious endgame character without a full respec. See our Warlock leveling build guide for the level-by-level route.
Abyss + Echoing Strike: the magic-damage hybrid
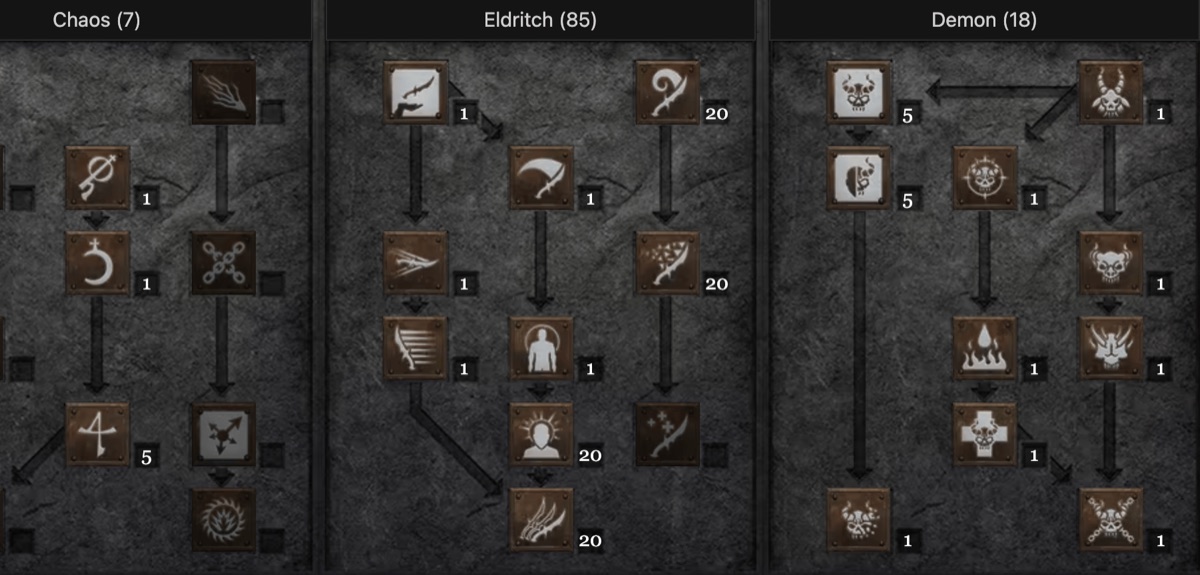
This is a community-tested setup — played to level 99 at /players 8 on shards — that merges the Abyss Warlock's crowd control with the Echoing Strike Warlock's damage model. Because both halves deal magic damage, one stat stack (+magic skill damage and -enemy magic resistance) feeds everything, and it dodges the physical Echoing Strike build's usual headaches: no attack rating requirements for the explosions, no aura or minion math, no hit checks on the AoE chains.
The damage engine is Hex: Purge detonating through Mirrored Blades: five blades times three explosions each means the real output is roughly the Hex: Purge tooltip times fifteen — with geared numbers that lands in the 75k+ magic damage range per rotation, and most monsters in the current game have low magic resistance to begin with. When checking your numbers, read the Hex: Purge tooltip, not Hex: Bane's — Bane's panel value needs dividing by five. Abyss itself contributes real sustained damage under a full +magic-damage setup, and the dagger's automatic Abyss cast doubles as a grouping tool: pull a pack in, drop Sigil: Death, and Echoing Strike detonates everything in the circle at once.
Weapon base and skill priorities
The ideal dagger base is +3 Hex: Purge / +3 Enhanced Entropy — the Entropy staffmod saves three skill points while letting Abyss reach its maximum radius. The best third staffmod is Abyss (most damage), then Blood Oath (safer), and at minimum Consume (saves a skill point). This is also the route that out-performs an early Obsession: that runeword costs a Zod and forces the grimoire off-hand, while a Wizardspike plus Mara's Kaleidoscope plus Spirit shield is a cheap, perfectly serviceable bridge until the endgame pieces land.
- Max Hex: Purge and its linked partners Eldritch Blast and Hex: Bane.
- Max Mirrored Blades with hard points — you need 20 for five blades.
- Get Sigil: Death to level 20 after Battle Command: its 8-yard detonation behaves like a corpse-explosion chain, and in dense packs one Abyss pull plus a sigil plus a few Echoing Strike hits sets off the whole room. It takes practice — and it is worth it.
- Spare points (about six, depending on whether your dagger carries Consume or Sigil: Death): do not invest in the Defiler consume synergy — packs die before it matters. You only need two demons summoned: one to Consume for the magic damage and resistance-shred buff, one to Bind.
Gear: three helm-and-ring configurations
Gloves are Magefist in every version — the 20% FCR frees up belt and ring choices entirely, and the 25% mana regeneration matters when Abyss and Echoing Strike are both being cast on cooldown. The helm/ring core has three proven configurations:
- Safest: a +3 Eldritch Weapons / 20% FCR circlet socketed with two 15-all-resist/9-dexterity jewels (or two Um runes for 30 all-resist and a large attack-rating pool — 18 dexterity here is worth about 700 AR), plus two Sling rings. The Slings trade a little damage for utility: -enemy magic resistance, 40% MF, -30% enemy speed (-40% with Arachnid Mesh) and a large mana pool via their Energy rolls, which lowers the cost pressure on your Black Cleft setup. This is the utility configuration; raw output is the lowest of the three.
- Best all-round: Hellwarden's Will with a magic jewel, the Ars Dul'Mephistos grimoire with an Um, one Sling and one Raven Frost. You still hit 30 all-resist, and Raven Frost's 20 dexterity / 250 AR multiplies with the percentage AR from skills and the grimoire — the character screen undersells this because it does not show the Hex: Purge and Echoing Strike buffs. With this much AR the mercenary drops Blessed Aim and runs Prayer instead.
- Maximum damage: a Warlock circlet with a 15-all-resist/7% FHR jewel, the grimoire with a magic jewel, and two Opalvein rings. FHR lands exactly on the 56% breakpoint, with 6 EK and 6 LK (20 LK once Enigma is on) covering sustain. Every point of +magic damage here is a true percent increase, and with roughly -48 enemy magic resistance already stacked from jewels, the grimoire, Consume Defiler and the helm, -resistance stops being the bottleneck — this is the highest-output set, at the cost of AR.
Mercenary: an Act 2 Prayer mercenary with Insight and a Cure helm — the stacked healing triples recovery, and with enough +skills the Insight reaches level 17 Meditation. Charms are simple: 7% MF / 5 all-resist small charms (plain 5-resist ones early), and plain +Eldritch Weapons grand charms; the build's life pool is safe without defensive skillers.
Sustain: why this build skips leech entirely
Testing says you do not need life or mana leech at all. Mana stays stable above 450 (after Battle Orders) under a level 17 Meditation, and a fully geared level 99 sits around 620 — the mercenary's Insight covers everything, with EK from rings as a bonus. Life leech is a trap here: your weapon's physical damage is too low for leech to matter, any hit that takes half your life calls for a full rejuv rather than leeching back, and the correct defense is positioning — pull packs with Abyss from range, let the demon body-block, and Prayer plus LK refills the bar. The setup was played to 99 at /players 8 over two weeks without any leech. Hardcore players can swap the belt to String of Ears for 8% life leech and 15% physical damage reduction (23% with Enigma) — the lost FCR is irrelevant because the build is already past its breakpoints.
The bound demon: hunting a Blunderbore
The recommended Bind Demon target is a Blunderbore — the huge, stun-capable beast that body-blocks like the Smith. Use a Worldstone Shard to terrorize Act 3 or Act 4, then hunt the Durance of Hate (Mauler variant) or the River of Flame (Urdar variant) for one that spawns with Stone Skin: physical immunity plus its natural lightning immunity is the ideal catch, and a Fanaticism or Holy Freeze aura roll is the dream. Act 3 reliably produces the physical-plus-lightning-immune combination; Act 4 can add cold immunity to the pool but the spawn is not guaranteed. Note for the catch itself: older advice recommended a gear swap (Mang Song's Lesson or Arioc's Needle plus a Stone of Jordan) to push Bind Demon to level 20 before casting — that trick no longer works, the interaction was fixed in a recent patch. Bind Demon now has to reach its target level through real skill investment, so budget the points instead of planning a swap.
Controls and fight patterns
Left-click Echoing Strike, right-click Teleport. Keep Call to Arms on swap (Q/E on the two buffs so W-swap goes straight into them), then F1 Abyss, F2 Echoing Strike, F3 Sigil: Death, F4 Psychic Ward (always on), F5 Summon Defiler, F6 Consume, F7 Eldritch Blast, F8 Hex: Purge, and R for Engorge to heal the demon. After buffing, F4-through-F8 applies everything; the Hex: Purge blade state lasts ten minutes, so F8 only needs an occasional refresh. Routine fights are F1 + F2; dense rooms are F1 + F3 for the pull-and-detonate chain. Leave Sigil: Death out when finishing a Herald if you want the corpse intact. Swap F8 to Bind Demon temporarily when recasting your demon. For the Ancients, move F1 to Sigil: Lethargy and R to the dagger's Decrepify charges and control the fight with those two. Baal needs no slow at all — just F1 + F2.
Alternative configurations
- Hardcore-safe: String of Ears belt, grimoire with Um, Sling plus Opalvein — 23% physical damage reduction with steady (if small) leech on top.
- Maximum AR: Gheed's Wager belt, grimoire with an all-resist jewel, Warlock circlet with a 15-all-resist/7% FHR jewel to reach the 56% FHR breakpoint, Opalvein plus Raven Frost — Raven Frost's dexterity and flat AR multiply with the percentage AR skills for the highest accuracy of the three. The author's pick for strongest overall, if you can find a good Gheed's Wager.
- Balanced: Arachnid Mesh belt, grimoire with Um, Sling plus Opalvein — balanced resistance shred and damage, at the cost of accuracy.
None of the three configurations need mana leech — the Insight mercenary alone keeps the blue bar from moving.
How to spend skill and stat points
Regardless of which build you pick, a few D2R fundamentals apply to the Warlock exactly as they do to the classic seven classes:
- Max your main damage skill and its listed synergies before spreading points thin — D2R damage scales through synergy ranks, not through dabbling.
- Keep one point in key utility skills the build guide flags (movement, crowd control, or survivability one-pointers).
- Strength and Dexterity: only enough for your planned gear. Energy: none. Vitality: everything remaining.
- Save your Akara respecs. Use the first only if your leveling setup truly stalls; Tokens of Absolution from act bosses are the renewable option later.
Warlock breakpoint tables (cast rate, hit recovery, block rate) are confirmed and published — the class shares the Necromancer's frames — so you can plan gear around the 75% and 125% FCR targets. Full tables on our Warlock skill tree & breakpoints page.
Gear and runeword priorities
Warlock gearing follows the same economy as the rest of D2R: runewords carry the early and midgame, then chase uniques and rares fill out the endgame. The Reign of the Warlock patch also added new runewords, several of which fit the class well — Authority is highlighted as a strong early-to-midgame option, while Vigilance leans defensive.
Priority order for a fresh Warlock:
- Classic leveling runewords (Stealth, Spirit, Insight for the mercenary) — see runewords by level.
- New Patch 3.0 runewords that match your build — see Warlock runewords and the Infernal Edition runewords list.
- Build-specific best-in-slot items from the Echoing Strike guide's gear tables.
Where to farm with a Warlock
Once your build is assembled, aim it at the zones that pay best. Terror Zones are the default answer in the current patch — scaled monster levels mean better experience and drop potential — with Chaos Sanctuary, Travincal, the Pit and Ancient Tunnels as the evergreen alternatives. Our best farming spots guide ranks them for the current patch.